Pages

Thursday, September 29, 2011

To check your Ubuntu version using the command line:

1. TO CHECK UBUNTU VERSION;
  1. Open a Terminal (Applications -> Accessories -> Terminal).
  2. Type "lsb_release -a" and press Enter.
  3. The Ubuntu version will be displayed on the screen. 
2. CHANGE PERMISSION IN VAR/WWW

when you have install php in tour system in var/www/testphp.php. con't having write permission means you can do the command


If you can do this, try the following:
sudo chmod -R 777 /var/www

then do:
            sudo cp hello.php /var/www
I only recommend doing this if you know 100% that it is ok to set permissions on the whole WWW folder. By the sounds of it, you are running on your own production server as most live/shared hosting servers are setup so that the WWW folder is not in the /var folder (instead it is in the home folder of the user).
 
Be VERY careful when doing anything with the sudo prefix though, you can seriously damage your

    Thursday, July 14, 2011

    Javascript

     javascript is used to design the website and make easier and faster


    Document .write(" ");    this is the print the message
    <html>
    <head>
    <script type="text/javascript">
    function show_alert()
    {
    alert("Hello! I am super man");
    }
    </script>
    </head>
    <body>


    <button type="button" onclick="show_alert()" value="Show alert box">show alert box</button>

    </body>
    </html>

    Tuesday, May 17, 2011

    juggernaut


    The Juggernaut plugin for Ruby on Rails aims to revolutionize your Rails app by letting the server initiate a connection and push data to the client. In other words your app can have a real time connection to the server with the advantage of instant updates. Although the obvious use of this is for chat, the most exciting prospect is collaborative cms and wikis.


    Install
    1. nstall the prerequisites
    2. execute the command in rails:
    3. ruby script/plugin install git://github.com/maccman/juggernaut_plugin.git
            
    4. Add this to any pages you want Juggernaut 'enabled':
    5. <%= javascript_include_tag 'prototype', :juggernaut %>
            
    6. Also add this to the head of any views you want to use Juggernaut:
    7. <%= juggernaut %>
              
    8. Install the gem:
    9. sudo gem install juggernaut
              
    10. Configure the gem:
    11. juggernaut -g juggernaut.yml
             
    12. Start the push server:
    13. juggernaut -c juggernaut.yml
              
    14. Now, visit the view you made earlier, you should see a msg saying 'Juggernaut Connected on localhost:5001' (If you're using Firebug it'll appear in that, otherwise it'll be an alert)
    15. Then, to send data to juggernaut, execute this in the console:
    16. Juggernaut.send_to_all("alert('hi from juggernaut')"
       
       
      this is the link : http://juggernaut.rubyforge.org/ 

    Thursday, May 5, 2011

    How to set up PuTTY and connect to victorio

    Doubleclick on the PuTTY.exe icon, and get a small box in return. To the right, you are prompted for "Host Name". Ex.192.168.1.5  (where user is your username). Give the connection a name, e.g. "victorio" (in the space one field down).

    Then, click Terminal to the left, and choose UTF-8 (or, in recent versions: In the leftmost box (Category) of the Putty settings box, under Window choose Translation.

    The default translation is ISO-8859-1, you should open the list and choose UTF-8. Font size 8 gives you a normal amount on text, and most monitors give you 50 lines of text.

    After having made these choices, go back to the first (or rightmost) menu, and click on save in the menu to the rignt. Make sure SSH is chosen under "Protocol", and click on "Open" at the bottom of the window.

    If everything is ok, you will find a new window in front of you, prompting for your user name. Write it, and then press the ENTER key, and write your password, followed by ENTER. Then you are logged in.
    This presupposes that you have a Sámi keyboard on your PC.

    From 2004 onwards all new Windows XP systems have Sámi keyboards installed, you may find it by right-clicking the keyboard symbol, or via the Control Panel.

    Wednesday, May 4, 2011

    Heroku

    To create an account an heroku site  http://www.heroku.com
    install heroku gem

    $ sudo gem install heroku

    to add a ssh keys and other details into heroku
    $ heroku keys:add #it will automatically fetch our ssh keys at before u install the ssh in our system
    $ heroku create #it create a link at random
    or u want sepecfic name to type

    $ heroku create sample

    to upload our git code repositary to heroku account

    $ git push heroku master
    $ heroku rake db:migrate # this command to upload our database skeleton(schema)
    $ heroku open # this command is open our page in browser

    Github

    Install git-core package in your system

    $sudo apt-get install git-core

    go to ur project directory. At first to create a empty repository

    $ git init

    add our code into empty repostitary

    $ git add .

    after u make an any change to commit into ur git repo

    $ git commit -m “Initial commit”   #ur comments in double quote
    ===========================================================
    github:

    create an account in github.com
    install ssh in ur system

    $ sudo apt-get install ssh

    if already ssh installed means u generate a new key using following commands
    $ ssh-keygen -t rsa -C  ”ksrajkumar87@gmail.com” # your mail id
    to add ur ssh key to github site

    $cd ~/.ssh
    $gedit  id_rsa.pub

    to copy the whole content

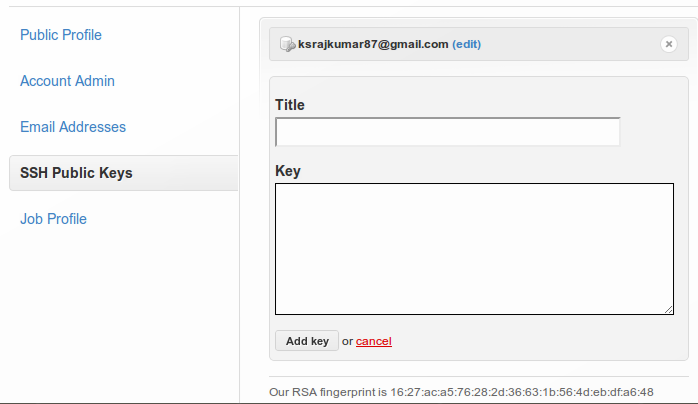
    and open your github.com account and go account settings=>ssh publc keys=>add another public key=> to paste your key in the key field
    and create a repository in dashboard
    configure  git with the ur system and git account at  first time only
    $ cd project_dir # go to ur project directory

    $ git config –global user.name “ksrajkumar” #github user name
    $ git config –global user.email ksrajkumar87@gmail.com # your mail ID
    above two steps are first time paring only
    to open your project directory to upload your local git into github site
    $ git remote add origin git@github.com:ksrajkumar/first_app.git
    $ git push origin master

    Friday, April 29, 2011

    MET DR.Kannan

    Today i met Dr.kannan IIT Bombay . i got nice experience about project, and he also told one government project about video editing tutorial .