Pages

Tuesday, December 27, 2011

Data Definition Language (DDL):

Data Definition Language;

This is the definition level language which includes the following statements.

A) CREATE Statement
B) ALTER Statement
C) DROP Statement


A) CREATE Statement: This Statement is used for creating the database and its objects.

B) ALTER Statement: This Statement is used for modifying the database and its objects.

C) DROP Statement: This Statement is used for deleting the database and its objects.

create a TABLE (Syntax):

CREATE TABLE Tablename (Column1 Datatype, Column2 Datatype,……..)

Example:

CREATE TABLE CUSTOMER (CNO INT, CNAME VARCHAR (20), CITY VARCHAR9 (20));

Example:

CREATE TABLE EMP(EMPNO INT, ENAME VARCHAR(20),SAL MONEY,DEPTNO INT);

The above two queries creates two tables with names CUSTOMER, EMP.


ALTER the Database(Syntax):


In Three ways we can modify the tables

1. By adding the new column to the Existing Table
Syntax:

ALTER TABLE TABLENAME ADD NEWCOLUMN DATATYPE [,……..N]

Example:

ALTER TABLE EMP ADD BONUS MONEY

The above statement adds Bonus column to EMP table

2. By changing the Data type of an Existing column:

Syntax:

ALTER TABLE TABLENAME ALTER COLUMN COLUMNNAME NEWDATATYPE

Example: ALTER TABLE EMP ALTER COLUMN EMPNO BIGINT

The above statement changes the EMPNO data type from INT to BIGINT.

3. By Dropping the Existing column from Existing Table:

Syntax: ALTER TABLE TABLENAME DROP COLUMN COLUMNNAME [,……..N]

Example: ALTER TABLE EMP DROP COLUMN ENAME, SAL

The above statement deletes two existing columns ENAME, SAL from EMP Table.


DROP Database(syntax):

DROP DATABASE DATABASENAME

Example: DROP DATABASE NRSTT

The above statement deletes NRSTT database and its objects
Tuesday, October 4, 2011

Installing LAMP On Ubuntu For Newbies

Installing LAMP On Ubuntu For Newbies

in this guide I will show you how to install a LAMP system. LAMP stands for Linux, Apache, MySQL, PHP. The guide is intended to help those who have very little knowlegde of using Linux.

2. Copy/Paste the following line of code into Terminal and then press enter:

sudo apt-get install apache2
3. The Terminal will then ask you for you're password, type it and then press enter.

Testing Apache

To make sure everything installed correctly we will now test Apache to ensure it is working properly.

1. Open up any web browser and then enter the following into the web address:

http://localhost/

You should see a folder entitled apache2-default/. Open it and you will see a message saying "It works!" , congrats to you!


Install PHP

In this part we will install PHP 5.

Step 1. Again open up the Terminal (Applications > Accessories > Terminal).

Step 2. Copy/Paste the following line into Terminal and press enter:

sudo apt-get install php5 libapache2-mod-php5

Step 3. In order for PHP to work and be compatible with Apache we must restart it. Type the following code in Terminal to do this:

sudo /etc/init.d/apache2 restart


Test PHP

To ensure there are no issues with PHP let's give it a quick test run.

Step 1. In the terminal copy/paste the following line:

sudo gedit /var/www/testphp.php

This will open up a file called phptest.php.

Step 2. Copy/Paste this line into the phptest file:

<?php phpinfo(); ?>
Step 3. Save and close the file.

Step 4. Now open you're web browser and type the following into the web address:

http://localhost/testphp.php


Install MySQL

To finish this guide up we will install MySQL. (Note - Out of Apache and PHP, MySQL is the most difficult to set up. I will provide some great resources for anyone having trouble at the end of this guide.)

Step 1. Once again open up the amazing Terminal and then copy/paste this line:

sudo apt-get install mysql-server
Step 2 (optional). In order for other computers on your network to view the server you have created, you must first edit the "Bind Address". Begin by opening up Terminal to edit the my.cnf file.

gksudo gedit /etc/mysql/my.cnf

Change the line

bind-address = 127.0.0.1
And change the 127.0.0.1 to your IP address.

Step 3. This is where things may start to get tricky. Begin by typing the following into Terminal:

mysql -u root

Following that copy/paste this line:

mysql> SET PASSWORD FOR 'root'@'localhost' = PASSWORD('yourpassword');

(Make sure to change yourpassword to a password of your choice.)

Step 4. We are now going to install a program called phpMyAdmin which is an easy tool to edit your databases. Copy/paste the following line into Terminal:

sudo apt-get install libapache2-mod-auth-mysql php5-mysql phpmyadmin

After that is installed our next task is to get PHP to work with MySQL. To do this we will need to open a file entitled php.ini. To open it type the following:

gksudo gedit /etc/php5/apache2/php.ini

Now we are going to have to uncomment the following line by taking out the semicolon (;).

Change this line:

;extension=mysql.so

To look like this:

extension=mysql.so


if you have problem or error go to visit : 

http://www.howtoforge.com/ubuntu_lamp_for_newbies

Thursday, September 29, 2011

To check your Ubuntu version using the command line:

1. TO CHECK UBUNTU VERSION;
  1. Open a Terminal (Applications -> Accessories -> Terminal).
  2. Type "lsb_release -a" and press Enter.
  3. The Ubuntu version will be displayed on the screen. 
2. CHANGE PERMISSION IN VAR/WWW

when you have install php in tour system in var/www/testphp.php. con't having write permission means you can do the command


If you can do this, try the following:
sudo chmod -R 777 /var/www

then do:
            sudo cp hello.php /var/www
I only recommend doing this if you know 100% that it is ok to set permissions on the whole WWW folder. By the sounds of it, you are running on your own production server as most live/shared hosting servers are setup so that the WWW folder is not in the /var folder (instead it is in the home folder of the user).
 
Be VERY careful when doing anything with the sudo prefix though, you can seriously damage your

    Thursday, July 14, 2011

    Javascript

     javascript is used to design the website and make easier and faster


    Document .write(" ");    this is the print the message
    <html>
    <head>
    <script type="text/javascript">
    function show_alert()
    {
    alert("Hello! I am super man");
    }
    </script>
    </head>
    <body>


    <button type="button" onclick="show_alert()" value="Show alert box">show alert box</button>

    </body>
    </html>

    Tuesday, May 17, 2011

    juggernaut


    The Juggernaut plugin for Ruby on Rails aims to revolutionize your Rails app by letting the server initiate a connection and push data to the client. In other words your app can have a real time connection to the server with the advantage of instant updates. Although the obvious use of this is for chat, the most exciting prospect is collaborative cms and wikis.


    Install
    1. nstall the prerequisites
    2. execute the command in rails:
    3. ruby script/plugin install git://github.com/maccman/juggernaut_plugin.git
            
    4. Add this to any pages you want Juggernaut 'enabled':
    5. <%= javascript_include_tag 'prototype', :juggernaut %>
            
    6. Also add this to the head of any views you want to use Juggernaut:
    7. <%= juggernaut %>
              
    8. Install the gem:
    9. sudo gem install juggernaut
              
    10. Configure the gem:
    11. juggernaut -g juggernaut.yml
             
    12. Start the push server:
    13. juggernaut -c juggernaut.yml
              
    14. Now, visit the view you made earlier, you should see a msg saying 'Juggernaut Connected on localhost:5001' (If you're using Firebug it'll appear in that, otherwise it'll be an alert)
    15. Then, to send data to juggernaut, execute this in the console:
    16. Juggernaut.send_to_all("alert('hi from juggernaut')"
       
       
      this is the link : http://juggernaut.rubyforge.org/ 

    Thursday, May 5, 2011

    How to set up PuTTY and connect to victorio

    Doubleclick on the PuTTY.exe icon, and get a small box in return. To the right, you are prompted for "Host Name". Ex.192.168.1.5  (where user is your username). Give the connection a name, e.g. "victorio" (in the space one field down).

    Then, click Terminal to the left, and choose UTF-8 (or, in recent versions: In the leftmost box (Category) of the Putty settings box, under Window choose Translation.

    The default translation is ISO-8859-1, you should open the list and choose UTF-8. Font size 8 gives you a normal amount on text, and most monitors give you 50 lines of text.

    After having made these choices, go back to the first (or rightmost) menu, and click on save in the menu to the rignt. Make sure SSH is chosen under "Protocol", and click on "Open" at the bottom of the window.

    If everything is ok, you will find a new window in front of you, prompting for your user name. Write it, and then press the ENTER key, and write your password, followed by ENTER. Then you are logged in.
    This presupposes that you have a Sámi keyboard on your PC.

    From 2004 onwards all new Windows XP systems have Sámi keyboards installed, you may find it by right-clicking the keyboard symbol, or via the Control Panel.

    Wednesday, May 4, 2011

    Heroku

    To create an account an heroku site  http://www.heroku.com
    install heroku gem

    $ sudo gem install heroku

    to add a ssh keys and other details into heroku
    $ heroku keys:add #it will automatically fetch our ssh keys at before u install the ssh in our system
    $ heroku create #it create a link at random
    or u want sepecfic name to type

    $ heroku create sample

    to upload our git code repositary to heroku account

    $ git push heroku master
    $ heroku rake db:migrate # this command to upload our database skeleton(schema)
    $ heroku open # this command is open our page in browser

    Github

    Install git-core package in your system

    $sudo apt-get install git-core

    go to ur project directory. At first to create a empty repository

    $ git init

    add our code into empty repostitary

    $ git add .

    after u make an any change to commit into ur git repo

    $ git commit -m “Initial commit”   #ur comments in double quote
    ===========================================================
    github:

    create an account in github.com
    install ssh in ur system

    $ sudo apt-get install ssh

    if already ssh installed means u generate a new key using following commands
    $ ssh-keygen -t rsa -C  ”ksrajkumar87@gmail.com” # your mail id
    to add ur ssh key to github site

    $cd ~/.ssh
    $gedit  id_rsa.pub

    to copy the whole content

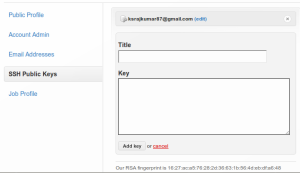
    and open your github.com account and go account settings=>ssh publc keys=>add another public key=> to paste your key in the key field
    and create a repository in dashboard
    configure  git with the ur system and git account at  first time only
    $ cd project_dir # go to ur project directory

    $ git config –global user.name “ksrajkumar” #github user name
    $ git config –global user.email ksrajkumar87@gmail.com # your mail ID
    above two steps are first time paring only
    to open your project directory to upload your local git into github site
    $ git remote add origin git@github.com:ksrajkumar/first_app.git
    $ git push origin master

    Friday, April 29, 2011

    MET DR.Kannan

    Today i met Dr.kannan IIT Bombay . i got nice experience about project, and he also told one government project about video editing tutorial .

    Saturday, April 23, 2011

    rake aborted

        when u have bundle intstalled, getting error like this
                 rake aborted 
                  uninitialized constant means
       go to gemfile  and give:    'mysql2',gem '0.2.7'

    Friday, April 1, 2011

    The MVC Architecture

    2.1 The MVC Architecture

    At the core of Rails is the Model, View, Controller architecture, usually just called MVC. MVC benefits include:
    • Isolation of business logic from the user interface
    • Ease of keeping code DRY
    • Making it clear where different types of code belong for easier maintenance
    2.1.1 Models
    A model represents the information (data) of the application and the rules to manipulate that data. In the case of Rails, models are primarily used for managing the rules of interaction with a corresponding database table. In most cases, one table in your database will correspond to one model in your application. The bulk of your application’s business logic will be concentrated in the models.
    2.1.2 Views
    Views represent the user interface of your application. In Rails, views are often HTML files with embedded Ruby code that perform tasks related solely to the presentation of the data. Views handle the job of providing data to the web browser or other tool that is used to make requests from your application.
    2.1.3 Controllers
    Controllers provide the “glue” between models and views. In Rails, controllers are responsible for processing the incoming requests from the web browser, interrogating the models for data, and passing that data on to the views for presentation.

    2.2 The Components of Rails

    Rails ships as many individual components.
    • Action Pack
      • Action Controller
      • Action Dispatch
      • Action View
    • Action Mailer
    • Active Model
    • Active Record
    • Active Resource
    • Active Support
    • Railties
    2.2.1 Action Pack
    Action Pack is a single gem that contains Action Controller, Action View and Action Dispatch. The “VC” part of “MVC”.
    2.2.2 Action Controller
    Action Controller is the component that manages the controllers in a Rails application. The Action Controller framework processes incoming requests to a Rails application, extracts parameters, and dispatches them to the intended action. Services provided by Action Controller include session management, template rendering, and redirect management.
    2.2.3 Action View
    Action View manages the views of your Rails application. It can create both HTML and XML output by default. Action View manages rendering templates, including nested and partial templates, and includes built-in AJAX support.
    2.2.4 Action Dispatch
    Action Dispatch handles routing of web requests and dispatches them as you want, either to your application or any other Rack application.
    2.2.5 Action Mailer
    Action Mailer is a framework for building e-mail services. You can use Action Mailer to receive and process incoming email and send simple plain text or complex multipart emails based on flexible templates.
    2.2.6 Active Model
    Active Model provides a defined interface between the Action Pack gem services and Object Relationship Mapping gems such as Active Record. Active Model allows Rails to utilize other ORM frameworks in place of Active Record if your application needs this.
    2.2.7 Active Record
    Active Record is the base for the models in a Rails application. It provides database independence, basic CRUD functionality, advanced finding capabilities, and the ability to relate models to one another, among other services.
    2.2.8 Active Resource
    Active Resource provides a framework for managing the connection between business objects and RESTful web services. It implements a way to map web-based resources to local objects with CRUD semantics.

    2.2.9 Active Support
    Active Support is an extensive collection of utility classes and standard Ruby library extensions that are used in the Rails, both by the core code and by your applications.
    2.2.10 Railties
    Railties is the core Rails code that builds new Rails applications and glues the various frameworks and plugins together in any Rails application.

    Thursday, March 31, 2011

    What is Mean By Ruby on Rails

       it's a two part one is"Ruby" and another one is "Rails"

    Ruby:

    •   it's a object Oriented programming language
    • created in 1995 'YUKIHIRO MATSUMUTO' ('matz')
    • used for many purpose, not just web applications
     Rails:

    • open source, web application framework
    • written in Ruby
    • created in 2003 by 'DAVID HEINEMIER HANSSON' ('DHH')
    • created as foundation of 37 signals Basecamp and then released as open source in 2004
    Framework:

        a set of code Libraries [control the program] and Data structures that provide generic functionality

    Why Use Ruby on Rails:

          object oriented, easily readable, unsurprising Syntax and behavior

    Dry Code:

    Donot repeat yourself, consistent code that is easily to maintain

    Convention Over Configuration:

    • sensible default, only specify unconventional aspects
    • speeds development, less code to maintain follows best practice(optional)
    Webserver:

    • Apache 1 or 2
    • passenger |mod_rails |
    • Nginx (Engine X")
    • Lighttp ("Lighty")
    • Mongral
    • webrick


    Monday, March 21, 2011

    Line Item (or) Nested Model

    In this model we are using [jquery & Ajax],   Guided by Mr.Thyagarajan

    jQuery :   is a cross-browser JavaScript library designed to simplify the client-side scripting of HTML.[1] It was released in January 2006 at BarCamp NYC by John Resig.

     AJAX:

    AJAX = Asynchronous JavaScript and XML.
    AJAX is not a new programming language, but a new way to use existing standards.
    AJAX is the art of exchanging data with a server, and update parts of a web page - without reloading the whole page.

     im learning how  work jquery and ajax in rails in this example is given below

    first we create a rails folder

    $ rails new land -d mysql

    next we are entering a project directotry

    $cd land/

    edit the database.yml and enter the mysql password
    $ gedit config/database.yml

    create a scaffold  name& address:

    $rails g scaffold Country name:string address:string
     
    create a scaffold  name&references
     
    $rails g scaffold State name:string country:references

    create a scaffold city name & references;

    $rails g scaffold City name:string state:references


    create the database and migrate it:
    $rake db:create
    $rake db:migrate

    before move the concept,  Jquery file download from http://jquery.com/ .copied to the public/javascript folder like jquery.js and we will create the first.js

         now how jquery is working , it will explained given below.
    app/views/layout and then open the appliation.html.erb
       given the jquery folder name &power.js
     
     <%= stylesheet_link_tag :all %>
      <%= javascript_include_tag 'jquery-1.5.1', 'power' %>
      <%= csrf_meta_tag %>
    next we move to app/views/countries folder just open the _form.html.erb 
           
     <div>
    <pre> <%= f.label :name %><br />
    <%= f.text_field :name, :id => 'countries_name_id'  %>
    </div>
    open the javascript and enter the given code:
      $(document).ready(function(){
    $('#countries_name_id').click(function(){
    alert('check');
    });
    });
     start the sever [localhost:3000/countries]
    then output will be given in 


     now we are going to create, under the folder _form.html.erb


     <div class='add states' >
      <%= add_state_link 'add_states' %>
      </div>
     <div id="result">
    </div>


    here 'add_state_link' is defined as helper class 
                app/helpers/countries_helper and then define it by

    def add_state_link(name)
    link_to name, '#', :class => 'add_state_class'
    end

    it will link as javascript  it contains [public/javascript] like this power.js

     $(document).ready(function(){
    $('.add_state_class').click(function(){
    alert('check');
    });
    });

    the output is : 


     it's working so we need ajax in nested model and then we define url in the success handler:
    $(document).ready(function(){
    $('.add_state_class').click(function(){
    $.ajax({
    url: "/countries/add_states",
    method: 'POST',
    data: '',
    success: function(data){
    $(data).appendTo('#result');
    /*alert('checking');*/
    }
    });
    });
    });
    start the sever and click add_state it's giving Routingerror like this:

                                               
       so rectify this error , go to config/ routes .rb and just paste the code like this

    match "countries/add_states" => "countries#add_states"
    resources :countries

    next we are going to controller folder  app/controllers/countries_controller.rb
    add like this:

    def add_states
    render :partial => 'states', :locals => {:state_object => State.new}
    end

    it will redirect the app/views/countries/_state.html.erb .  it will create our own:

    <div>
    <%= fields_for "country[new_state_attributes][]",state_object do |state_form|
    %>
     <%= state_form.text_field  :name %>
    <% end %>
     </div>

    last step is redirected app/models/country.rb 

     class Country < ActiveRecord::Base
    has_many :states
    accepts_nested_attributes_for :states, :reject_if => lambda {|a| a.values.all?(&:blank?) }, :allow_destroy => true
    def new_state_attributes=attributes
    attributes.each do |each_record|
    states.build(each_record)
    end
    end
    end

    and define the state.rb

    class State < ActiveRecord::Base
      belongs_to :country
    has_many :cities
    accepts_nested_attributes_for :cities
    end 

    then output is like this: 

     one example is entering country name and state name in this example is:  


                              finally it will successfully created


    Wednesday, March 9, 2011

    Rails model relationship

           
                         Mr.Thyagarajan(sir) Took the class

    Hi today i learning rails model relationship concept:

    has_many,belongs_to: [habtm]
    has_and_belongs_to_many:
    has_many :through .

    1.has_many,belongs_to:
                 in this example is  more than employee working under the company
       
    class Clinic < ActiveRecord::Base
    has_many :employee
    end
    2.has_and_belongs_to_many:
                   doctors have many patient , and patient have many doctors


    class doctor < ActiveRecord::Base 
    has_and_belongs_to_many :patient
    end
             
     3.has_many :through :         
      This explanation is [has_many :through] concept

     im creating rails model relationship in mobile marketing(project)
      [MSR,clinic and doctor through (tour)program]

    ~$ rails new mmfa -d mysql
        first we are creating a rails

    ~$ cd mmfa/
       entering a project directory

    ~/mmfa$ rails generate model Clinic name:string address:string
        generate a rails in clinic

    ~/mmfa$ rails generate model Doctors name:string phone:string mail:string
      generate a rails in doctors

    ~/mmfa$ gedit config/database.yml
       edit the database and enter the password

    ~/mmfa$ rake db:create
    ~/mmfa$ rake db:migrate


    ~/mmfa$ rails generate model Tour clinic_id:integer doctor_id:integer
       tour is a bridge b/w clinic and doctor

    ~/mmfa$ gedit app/models/clinic.rb  app/models/doctor.rb  app/models/tour.rb
        edit three models

    1.clinic.rb

    class Clinic < ActiveRecord::Base
    has_many :tours
    has_many :doctors, :through => :tours 
    end

    2.doctors.rb

     class Doctor < ActiveRecord::Base
    has_many :tours
    has_many :clinics, :through => :tours
    end

    3.tour.rb

    class Tour < ActiveRecord::Base
    belongs_to :clinic
    belongs_to :doctor
    end

    ~/mmfa$ rake db:migrate 
    next we are open a new tab entering a project directory

    ~/mmfa$ rails console
       entering a irb
      
     
     the example is given below
      example:

    p=Clinic.new
    => #<Clinic id: nil, name: nil, address: nil, created_at: nil, updated_at: nil>
    irb(main):003:0> p.name="bava"
    => "bava"
    irb(main):004:0> p.save
    => true
    irb(main):005:0> p=Clinic.new
    => #<Clinic id: nil, name: nil, address: nil, created_at: nil, updated_at: nil>
    irb(main):006:0> p.name="kovai"
    => "kovai"
    irb(main):004:0> p.save
    => true
     
    entering a doctors name:
    the example is given below
    example:

    p=Doctor.new
    => #<Doctor id: nil, name: nil, phone: nil, created_at: nil, updated_at: nil>
    irb(main):022:0> p.name="mani"
    => "mani"
    irb(main):023:0> p.save
    => true

    irb(main):024:0> p=Doctor.new
    => #<Doctor id: nil, name: nil, phone: nil, created_at: nil, updated_at: nil>
    irb(main):025:0> p.name="vadi"
    => "vadi"
    irb(main):026:0> p.save
    => true


    irb(main):036:0> p=Tour.new

    => #<Tour id: nil, clinic_id: nil, doctor_id: nil, created_at: nil, updated_at: nil>
    irb(main):037:0> p.clinic = Clinic.find(3)
    => #<Clinic id: 3, name: "voc", address: nil, created_at: "2011-03-09 17:44:51", updated_at: "2011-03-09 17:44:51">
    irb(main):038:0> p.doctor = Doctor.find(3)
    => #<Doctor id: 3, name: "kalai", phone: nil, created_at: "2011-03-09 17:52:01", updated_at: "2011-03-09 17:52:01">
    irb(main):039:0> p.save
    => true
    p=Tour.all

    l> select* from tours;
    +----+-----------+-----------+---------------------+---------------------+
    | id | clinic_id | doctor_id | created_at          | updated_at          |
    +----+-----------+-----------+---------------------+---------------------+
    |  1 |         3 |         3 | 2011-03-09 17:54:22 | 2011-03-09 17:54:22 |
    |  2 |         2 |         4 | 2011-03-09 18:06:14 | 2011-03-09 18:06:14 |
    |  3 |         2 |         4 | 2011-03-09 18:07:16 | 2011-03-09 18:08:19 |
    +----+-----------+-----------+---------------------+---------------------+
    3 rows in set (0.00 sec)

    mysql> select* from clinics;
    +----+--------+---------+---------------------+---------------------+
    | id | name   | address | created_at          | updated_at          |
    +----+--------+---------+---------------------+---------------------+
    |  1 | bava   | NULL    | 2011-03-09 17:44:02 | 2011-03-09 17:44:02 |
    |  2 | gandhi | NULL    | 2011-03-09 17:44:34 | 2011-03-09 17:44:34 |
    |  3 | voc    | NULL    | 2011-03-09 17:44:51 | 2011-03-09 17:44:51 |
    |  4 | ramana | NULL    | 2011-03-09 17:45:14 | 2011-03-09 17:45:14 |
    |  5 | kovai  | NULL    | 2011-03-09 17:45:40 | 2011-03-09 17:45:40 |
    +----+--------+---------+---------------------+---------------------+
    5 rows in set (0.00 sec)

    mysql> select* from doctors;
    +----+---------+-------+---------------------+---------------------+
    | id | name    | phone | created_at          | updated_at          |
    +----+---------+-------+---------------------+---------------------+
    |  1 | mani    | NULL  | 2011-03-09 17:51:09 | 2011-03-09 17:51:09 |
    |  2 | vadi    | NULL  | 2011-03-09 17:51:37 | 2011-03-09 17:51:37 |
    |  3 | kalai   | NULL  | 2011-03-09 17:52:01 | 2011-03-09 17:52:01 |
    |  4 | revathi | NULL  | 2011-03-09 17:52:29 | 2011-03-09 17:52:29 |
    |  5 | devi    | NULL  | 2011-03-09 17:52:51 | 2011-03-09 17:52:51 |
    +----+---------+-------+---------------------+---------------------+
    5 rows in set (0.00 sec)


    Saturday, February 12, 2011

    Setting of root password in ubundu(linux)

    Ubuntu has no password for root user as default.If you want to reset root password, you need to use sudo passwd command in shell. To Open shell, click Applications » Accessories » Terminal. In shell,type sudo passwd. It will ask you password. Type your login password.
    venkat@venkat-desktop:~$ sudo passwd
    Password:
    And then it will ask you to reset password for root. Type it twice
    Enter new UNIX password:
    Retype new UNIX password:
    After reset root password. It will show this message in Shell(passwd: password updated successfully).

    Rails Installation

           Installation of  rails and mysql

    step1:Ruby installation:
    $sudo apt-get install ruby ruby-dev libopenssl-ruby1.8 irb ri rdoc

    Step2:Install Mysql
     if mysql allready installed in your computer give the below command
    $sudo apt-get install libmysql-ruby sqlite3

    if mysql not install in your computer
    $sudo apt-get install mysql-server sqlite3 libmysql-ruby

    step3:some header files needs to install for compile
    $sudo apt-get install build-essential libmysqlclient-dev libmysql-ruby libsqlite3-ruby libsqlite3-dev

    Step4:Need gem install
    $sudo apt-get install rubygems

    Step5:install mysql,rails,sqlite3-ruby mongrel through rubygems
    $ sudo gem install rails mysql sqlite3-ruby mongrel
    if this show errors
    $sudo apt-get install rails rails-doc rails-ruby1.8
    then retry this
    $ sudo gem install rails mysql sqlite3-ruby mongrel
    Rails successfully install your system..
    To check if is install
    open terminal
    $rails -v
    Rails 3.0.3

       if you have any doubt in installation in rails and mysql  go throught the blog
        http://www.coachfactory.blogspot.com/  you can get clear idea about this

    Thursday, January 20, 2011

    Project Title : Mobile Marketing Force Automation

    The description:

    All the pharmaceutical industries marketing department has its marketing force asmedical representatives are spread across the country. It is difficult to provide each medical representatives a laptop for updating their marketing reports such as samples delivery todoctors, collecting stock requirements from the pharmacy for their product , schedules of marketing representatives for meeting the doctors,preparing the sales report .

    MOBILE MARKETING FORCE AUTOMATION (MMFA) is the system which works on a mobile

    phone (typically Nokia 6600) which has a browser (opera) and has connection to the server space which is hosted in the linux platform(Server management is tackkled by the third party hosting company).All the above said reports inputs are managed through the mobile phone. The mobile phone has the internet connection (provided by bsnl gprs or hutch service) which

    cost from rupees 99/- to Rs 300/- per month.The RoR application has a specified cascading Style sheet(CSS)

    which works on a mobile and separate Cascading case sheet to work on a pc for providing

    inputs to system. The server space is taken from a hosting company which has a mysql/postgres

    sql application.the RoR applicationresides in the server and it is been accessed by the

    client(mobile phone) via internet connection.

    Softwares prerequistive knowledge : RoR,MYSQL,Linux.

    Platform                :  Browser based application works independant
    on any platform
    
    Client                  :  RoR application served on any compatible browser
    Client Os               :  Symbian O/s or equivalent
    Client hardware         :   Nokia 6600 or equivalent
    
    Server                  : Mysql db support
    Server Os               : Linux OS
    Server Hardware         : Intel dual core/core 2 duo processor


    Wednesday, January 12, 2011

    Today I Learn class class, class object,class Integer in Ruby

    Ruby is a perfect Object Oriented Programming Language. The features of the object-oriented programming language include:
    • Data Encapsulation:
    • Data Abstraction:
    • Polymorphism:
    • Inheritance:


    class class :
             Class is also is an Object (like any other object in the system) but it is not direct instance of Object, it is an instance of a derived class (Class in this case)

    Class object:
            An object-oriented program involves classes and objects. A class is the blueprint from which individual objects are created. In object-oriented terms, we say that your bicycle is an instance of the class of objects known as bicycles.
    Class integer:


    Tuesday, January 11, 2011

    Association on rails


    Briefly, Association Proxies are functions defined on an association. For example, in a library example, a Patron might have many books. This would look like

    class Patron < ActiveRecord::Base
      has_many :books
    end
     

    Tuesday, January 4, 2011

    Electricity bill

    print "enter the value: "
    consumed_units = gets.chomp.to_i
    buffer_variable = consumed_units
    if consumed_units > 0 and consumed_units <= 200
    consumed_unit_cost = consumed_units * 1
    consumed_units = 0
    else
    consumed_unit_cost = 200 * 1
    consumed_units = consumed_units - 200
    if (((consumed_units + 200) > 200) and  ((consumed_units + 200)<=350))
    consumed_unit_cost = consumed_unit_cost + (consumed_units * 1.5)
    consumed_units =0
    end
    end
    if (((consumed_units + 200) > 350) and  ((consumed_units + 200)<=500))
    consumed_unit_cost = consumed_unit_cost + (consumed_units * 2)
    consumed_units =0
    end
    if (((consumed_units + 200) > 500) and  ((consumed_units + 200)<=750))
    consumed_unit_cost = consumed_unit_cost + (consumed_units * 4)
    consumed_units =0
    end
    if (((consumed_units + 200) > 750) and  ((consumed_units + 200)<=1000))
    consumed_unit_cost = consumed_unit_cost + (consumed_units * 8)
    consumed_units =0
    end

    puts buffer_variable

    puts consumed_unit_cost

    mysql

          commands
    $rails new pms -d mysql
    $rails generate scaffold product name:string price:float abc_class:string fsn:string narration:text

         How to Remove the folder in complete :
                     rm -rf  [folder name]  :

    Today i learn about mysql and database connectivity

    $  sudo gem install rails --v=3.0.3
                         [this is the procedure of rails installation]
                 (Database connectivity)
                               rails new sample
                                $rails generate scaffold student name:string date_of_birth:number fathername:string mothername:string

    $rails server
    $rake db:migrate